Daphne’s Nursery

With everything going on this summer, it has been hard to put together posts about the house. My goal is to do so before I go back to work in August. Four weeks is enough time to get pictures hung and document everything right?

Daphne’s room is the only one I feel confident saying is complete. And of course it’s for the roommate that doesn’t really care what her room looks like.

I had picked this theme and color scheme long before we were even pregnant. I love the combination of navy and kelly green, and with the gray undertones-Perfection. I also loved the idea of sea creatures, so that is where the sea life came in.

Here is the grand tour of her room.

IMG_8025 (2)

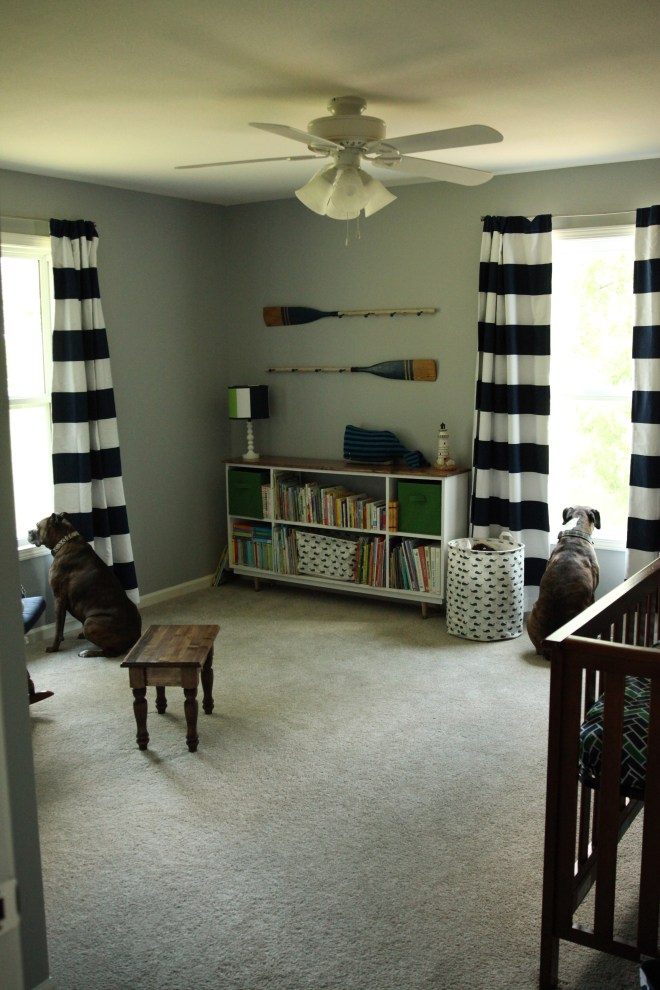
The dogs love this room because the windows have the best view of the entire yard and street. This is the view from the doorway.

IMG_8029 (2)

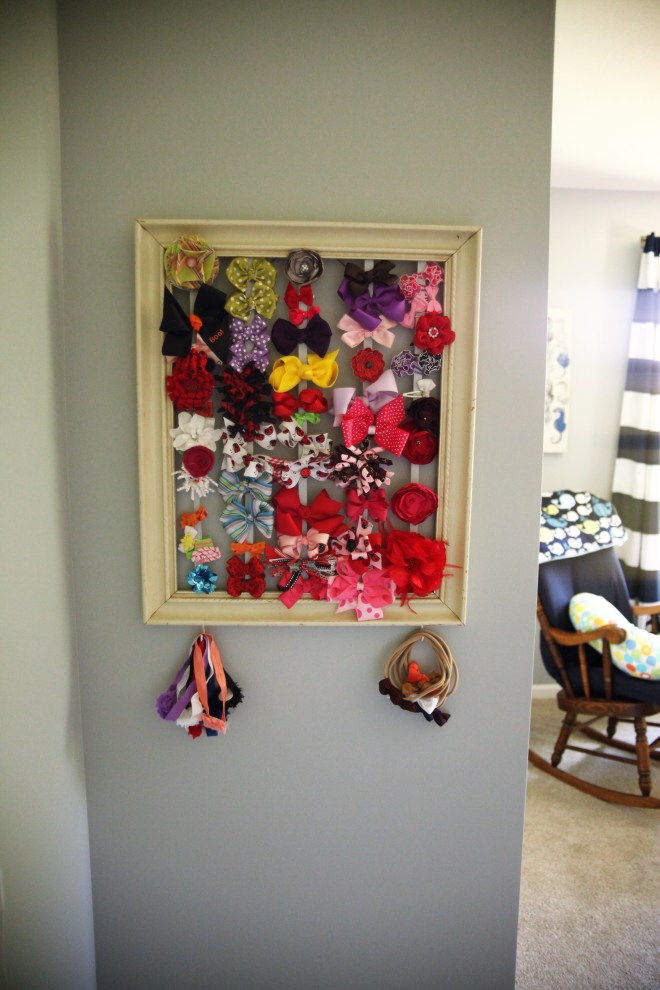
My sister-in-law made this bow rack to hold all the hair accessories for Daphne. All the bows were handed down from my niece too, so I love that. Someday she will have enough hair to actually wear them, but for now George likes to wear them. We need to add some more hooks to hold all her headbands.

IMG_8041 (2)

This is the same set we had for George, but with the new colors I feel like it looks so different. I love the cubbies to hide away all the things I need quickly during bedtime routines and diaper changes. There are onsies, sleepers, diapers, and more there. I got the green boxes from Amazon, and my in-laws found the blue whale bins at Home Goods. The one by the crib holds blankets. I got the stuffed octopus that is on the crib at Target.

The two pieces on the wall are from Hobby Lobby. They were having a wood sale, and we basically stole these for how cheap we got them.

IMG_8038 (2)

I love this sign. Such a good reminder.

IMG_8060 (2)

This whale bins and laundry basket I got on Amazon. The stuffed whale is from Target. The oars are from the Hobby Lobby steal. The little lighthouse was given to me by my grandpa, and I enjoy those little personal touches. And we have no shortage of books around here.

IMG_8052 (2)

This rocking chair was in George’s nursery as well. This time around, I did not make the chair cover. I got an outdoor chair cushion from Target. The seahorses are from Hobby Lobby as well.

The stool Tom made so I could feel more comfortable with my feet propped. We will be able to use this much past breastfeeding days too.

I got the curtains from Target when they were having a sale. I felt like I had really hit adult status because we have never had actual curtains before.

This is my favorite room in the house right now, and not just because it is done. I love the colors of the decor and the paint, and I especially love that we used the same furniture with George but it looks vastly different.

Now to just finish the rest of the house. And how do you decorate bathrooms?

George’s Nursery Reveal in Video

I want to remember things about this time. Every minute I get to spend with George is special. And I have no idea how long I will get these moments of just me and him, so I want to remember them here for years to come.

Part of that is remembering the place.

I spend most of my day in this room. I do most of his feedings in the rocking chair because it is the most comfortable for both of us. I read him stories here, and I introduce him to music while he makes faces at my singing. We play on the floor-really it’s him just flailing around as I pull him around on a blanket trying to imitate crawling and making sure the dogs don’t drown him in slobbers. I also spend a lot of time in the room just staring at how perfect he is and how lucky I am to be his mom.

So it may seem simple to outsiders, but this room is our world right now.

I love how light and airy everything turned out. It is just a friendly environment.

I did my first attempt at a video tour, so enjoy my commentary. (I have no idea what I am doing.)

If you have any questions about anything don’t hesitate to ask.

I also want to remember the sounds and the little things we do together. This may be a boring video to the soundtrack of “The Lion King,” but again the gurgles and faces made are my everything. And I don’t want to ever forget how precious these moments are.

So if you are inclined to watch a baby do nothing but baby things (which is honestly not much) for a couple minutes, this is the video for you. Spoiler alert, there are baby hiccups. Adorbs.

I still need to try to capture him searching for a pacy. Best George moment ever.

So that is George’s room. I can’t wait to see how these pieces grow up with him and transition into other uses as he changes.

Do you like decorating? Do rooms turn out they way you imagined?

Fabric Covered Boxes

I showed our lovely shelves yesterday. Once they were made, I realized we didn’t have enough boxes to make it look how I wanted pattern wise. Our Walmart didn’t sell orange ones, and I didn’t want to wait to purchase them on Amazon.

So after consulting Pinterest, I got the idea to just make my own fabric box.

We had so much of the elephant print left over, so I figured it would tie everything around the room together a little more. And diaper boxes make the perfect cubbies.

So really, I didn’t feel like I spent any money on these since the funds were allotted initially elsewhere. Plus these diapers were a gift, so really it’s even better!

Also this was a project to keep my bed rest behind preoccupied but still sitting.

Here is how I made them.

Supplies:  box, fabric of choice, hot glue gun

2014-08-17 16.44.25

First you need a box. Diaper boxes are the perfect size, but I am sure we all have gotten packages that hold equally perfect status.

I did not cut off the top flaps which others may do. We decided that it would make it a little sturdier to just fold and glue the flaps down inside the box. It’s not like they can be seen anyway.

2014-08-17 16.43.54

Then you want to cut out 4 squares of your fabric that fit the sides of the boxes. You will want to leave a little overlap on all sides so make them slightly bigger than each side you are measuring.

2014-08-17 16.46.20

I started with gluing the bottom first. See how the fabric hangs over the sides?

2014-08-17 16.47.06

Once the glue on the bottom is set, you flip the box and pull the fabric tight to glue it over the inside of the box. Be careful to make sure that the fabric is smooth before you start gluing, so it is really important to work fast with the hot glue gun.

2014-08-17 16.48.45

Then you will glue the overlap on the sides. I cut the fabric diagonally at the corners so it would lay more flat and you don’t have a lot of extra bunching happening. You will do this on the inside flaps as well. Basically just make sure all the edges of this square is glued down before you move to the next square.

You want to do the two parallel sides in a row:  example front and back first.

Once you have those two sides done, the next two are a little different.

2014-08-17 17.15.40

You will fold the extra fabric over first before you glue it on the box. This make it have smooth lines and make sure everything is covered neatly. It just makes for more even seams instead of jagged cut fabric, because we all know you can’t cut fabric perfectly straight or without frays. I just lined it up to the box and then glued anything that was extra over.

Once you do this, you will start from gluing the bottom down and then pulling it over the top just like the first two sides.

I then hot glued down the seams to make sure they stayed down.

2014-08-17 17.32.11

Hopefully you can see what I mean about the seams being flat. Since these are the sides, I wasn’t too anal about making the fabric line up perfectly pattern wise. I did try to make them as close as possible. Knowing that they will not be seen as much, it was not much of a priority.

One other thing to note, you could see the Pampers logo through the fabric where the elephants were. So I first glued down some off-white card-stock to cover the logos so it wouldn’t show through the completed project. You may want to check for this before you start gluing things down to make sure you don’t have the same problem with your fabric of choice.

Let me know if you have questions. Because you have to work fast with the hot glue, some of these pictures aren’t the best with explaining. Sorry!

It is a really easy project, and I finished two boxes in a half hour.

No thanks to the dogs enthusiasm…

2014-08-17 16.54.57

While doing my research on how to make these, I saw that other people added straps, bows, and whatnots to theirs. I wasn’t going to go that in depth on it. But now that I know how easy this is to do, I may just save diaper boxes that have yet to be opened to try more elaborate coverings.

For now, I think they are perfect for the nursery!

IMG_4649 IMG_4652

Have you tried covering boxes like this? How much do you use Pinterest to decorate your house?