Oogaa Bowltastic

It has been a while since I have baked something, so I wanted to try a new recipe this month.

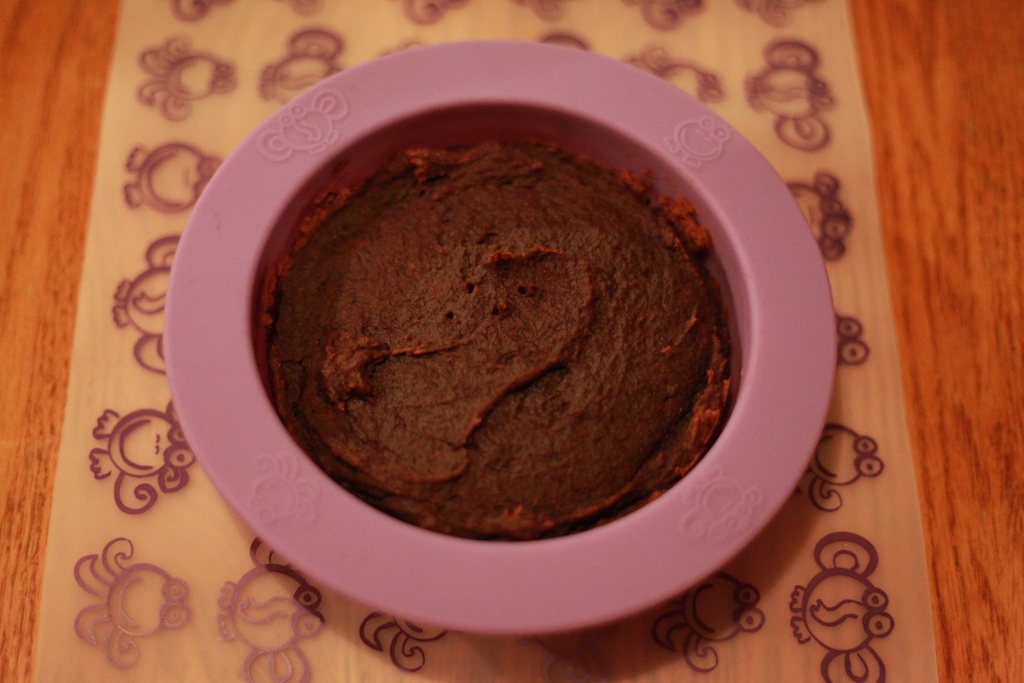
The Oogaa challenge this month was to try our baking on these bowls.

IMG_0627 (1024x676)

Y’all seriously.

I cannot speak enough about the high quality and amazingness of these products from Oogaa.

A kid friendly bowl, that you can BAKE in.

No baking in a metal tin and then transferring to a kid plate.

Instead of having to use several dishes, you can just use this one fun one!

I am all about easy clean up!

And speaking of clean up, instead of having to scrape or worry about cupcake liners, it is so simple to get the baked item out of the bowl. You just push it out since they are silicone. Fantastically easy, which I am sure is great for kids who are just known for their patience.

I also want to point out that in my lack of awareness I attempted to peel the brownie out of the bowl (right after pulling it out of the oven) with my bare hands. While I do not recommend this type of stupidity, I will say that it did not burn my hands as a metal baking sheet would have. So these are much safer, which is a bonus when you have kids helping you in the kitchen.

IMG_0745 (1024x683)

Tom and I had a severe sweet tooth brewing. After perusing Pinterest, these Pumpkin Brownies just called our names. And it seriously can’t get better than a two ingredient recipe. Sold.

This may sound like a fall recipe, but we are adults and we wanted pumpkin brownies.

We used this recipe here.

To critique the recipe, they weren’t exactly our favorite. They came out more fudgy than brownie. Don’t worry, I still ate them. Also I will note that it had nothing to do with the Oogaa bowl. I didn’t cut the recipe in half, so I had a lot of extra batter. I made some cupcakes with the extra, and they came out the same consistency. So if you want some pumpkin fudge, this is the way to go.

But regardless of if you use this recipe, you all need to get these bowls. I can’t wait to use it more and more once we get past this first stage of food. We started oatmeal this weekend, and these work great to heat that up in the microwave.

If you want to find more out about these bowls, visit their site here. We love this company, and we know you would too!

We did receive receive this bowl complimentary for testing purposes as an Oogaa Brand Partner. All thoughts and opinions are mine, and George’s of course!

Have you tried Oogaa products? What would you like to use from their line?

What’s In My Kitchen?

I love kitchen gadgets.

I could get lost watching infomercials on the latest NEW gadget that will change your life! Wouldn’t it be fun to test all those products out?

Tom and I have been known to go to Bed, Bath, And Beyond to just peruse new items and dream up our perfect kitchen setting. Seriously though, I got upset with Tom just the other day because he went without me to BB&B to pick up ice trays. Love that place.

I am always looking for ways to make things simpler in the kitchen. I love cooking, but I don’t like elaborate slave over for hours type of cooking. And this family just doesn’t have time for that during the week.

These are some of my favorite items that we use almost daily to make our lives a little easier. And these are things that are outside of your normal standard kitchenware like pots/pans and measuring cups.

1. KitchenAid Blender

Set-Talent_1175X1290_1_1image via

  • I make a smoothie every morning, so we needed a high powered blender that would stand up to my daily needs. I can put in frozen fruit, and this thing just whips them right up. It has also been helpful to puree food since I am making all George’s food. You really don’t need the “baby blender;” a regular one does just fine. These also come in different colors. Ours is a bright light blue which helps brighten up our counters.

2. Small Micro-Cooker

2776-smimage via

  • We use this item almost daily. We love steamed vegetables, and this is far and away the easiest way to prepare them. We just grab a bag of frozen veggies, pour in the desired amount, add a little water, and then pop it in the microwave for 5 minutes. Once you are done, you just pour out the water through the strainer lid, and then donezo. Perfect side dish for any meal. Right now it makes enough veggies for just the two of us, but we may look to get the bigger size once we have to start making meals for more than just us. I have done three helpings, but anymore than that I have to just run it twice. You can do a lot of things with this bad boy, but we usually stick to just steaming vegetables. Considering how awful I am at cooking rice, I should use this more often to cook that. Seriously, if you don’t have this, do yourself a favor and get this from Pampered Chef.

3. Mix’N Chop

2583-lgimage via

  • This is another must have from Pampered Chef. I LOVE THIS ITEM. I really struggle chopping up hamburger meat when I am cooking it, and I don’t need hamburgers in my skillet meals. This gadget helps you chop up your meat into smaller chunks so much better than a regular spatula without feeling like you have to do an arm workout to do so. We use this several times a week. This will change your life people.

4. KitchenAid Mixer

carousel-stand_mixers-craftedimage via

  • Another KitchenAid must. This is definitely the best wedding present we received. Sorry for all others, but this one really takes the cake. Literally, we make cakes with this. We don’t use this every day, but I would say almost weekly we use this sucker for something. We haven’t really explored any of the attachments, but I hear they are great too. I would love the pasta roller! We also are in need of a new beater since we have used it so much over the last 4 years.

5. Crockpot

  • No explanation needed. We use this great invention at least once a week. Set it and forget it!

6. Manual Food Processor

2593-lgimage via

  • Another favorite from Pampered Chef. I am the worst at cutting things. It is amazing I haven’t seriously injured myself in the past. Now, if any recipe calls for anything diced (or chunks) in the processor it goes. I have done onions, nuts, bread crumbs, meat, and so many other vegetables. It is really easy to maneuver, even easier when you get the husband to do it for you. It gets the job done, and no one is hurt!

These are all my own opinions, and I was not contacted by KitchenAid or Pampered Chef to speak about their items. But I would if they asked! I could talk about their products for dayssssss. We have so many other products of theirs that we love as well, but these are our most used and favorite saving-us-time items. And we will endorse any crockpot. They are the bomb.com.

Do you use any of these products? Do you love these brands as much as we do? What are your favorite kitchen items? What else should we be using to save us time?

Eggnog Snickerdoodles

I am joining in on the Twelve Days of Christmas Cookies with Lisa. Today’s theme is traditional cookies.

If you love eggnog and you love cookies (which is pretty traditional), or you just love desserts in general, these cookies are for you!

I got this recipe from my friend Melissa a few years back. They are now my go to holiday cookie. I have never heard a complaint!

Ingredients

  • 1/2 cup softened butter
  • 1/2 cup shortening
  • 2 cups plus 5 tablespoons sugar
  • 1 egg
  • 1 tsp rum extract
  • 1/2 cup evaporated milk
  • 1/2 cup refrigerated French vanilla non-dairy creamer
  • 5 1/2 cups flour
  • 1 tsp salt
  • 1 tsp baking soda
  • 1/2 tsp ground nutmeg

In a large bowl, cream the butter, shortening, and 2 cups of sugar until light and fluffy.

Beat in egg and rum extract.

Combine milk and creamer. Set aside

Combine the flour, salt, and baking soda.

Gradually add to creamed mixture, alternately with the milk mixture, beating well after each addition

In small bowl, combine nutmeg and remaining sugar.

Shape dough into small bowls and roll in nutmeg mixture.

Place 2 in apart on on un-greased baking sheets.

Flatten slightly with a glass.

Bake at 350° for 10-12 minutes or until lightly brown.

Cool for minutes before removing from pans.

Note:  One batch goes a long way.

It’s an easy recipe and will become your go to snickerdoodle! So yummy!

Sweet Potato Brownies

Yes you read that correctly. There are sweet potatoes in these brownies!

I saw this recipe on Pinterest a couple weeks ago, and combined with my craving for chocolate baked goods, I knew this would have to be on the docket to try out.

And as luck would have it, I had some sweet potatoes that were getting borderline too old too eat. (Have I mentioned before that sometimes my eyes are bigger than my appetite at the grocery store?)

Anyway, I thought this would be a great endeavor to fill a craving and not waste some of our produce. I used the same instructions this woman provided, but added my own thoughts to each piece.

Sweet Potato Brownies

Ingredients

  • 1 cup cooked sweet potatoes
  • 1 cup flour**
  • ½ cup cocoa powder
  • 1 tsp. baking powder
  • dash salt {1/8 t.}
  • ½ cup sugar
  • 1 egg
  • 4 T. oil {coconut, vegetable or canola}
  • 2 T. pure maple syrup or honey
  • 1 tsp. vanilla
  • **Decrease flour to ¾ cup if you prefer more fudge-like brownies.

**I doubled this original recipe since I don’t have a small brownie pan, and I also wanted to use a full sweet potato. I also used coconut oil and honey, but you can choose your poison on these areas.

Instructions

  1. Peel and chop 1 cup of raw sweet potatoes. Since they will not lay evenly in the cup, you want a lot more than what appears to be a cup. I just cut a whole potato and it was just perfect as I eyeballed 2 cups worth.
  2. Boil, microwave or bake the potatoes until soft. I microwaved them in a bowl of water for 15 minutes. You want to be able to put a fork in them easily.
  3. In a mixer bowl, combine ½ cup sugar, egg, 1 tsp. vanilla, 4 T of oil {coconut, vegetable or canola} and 2 T. maple syrup or honey.
  4. Beat on high for 30 minutes with your whisk attachment until frothy. (I am not sure that 30 minutes is really needed for this. It never got frothy for me. It just got creamy.)
  5. Meanwhile, combine the flour, ½ cup cocoa powder, 1 tsp. baking powder and dash of salt into a large bowl. Whisk them together to prevent lumps. Keep separate from wet ingredients for now.
  6. Add the hot, cooked potatoes right into the mixing bowl with the wet ingredients.
  7. Beat on high for 1 minute until the batter turns a lovely orange and there are just little bits of sweet potato. There were a lot of lumps in mine which I tried smashing with a spatula, but not all of them would go away. It will be fine once you bake it.
  8. Now, with the mixer on slow, add your dry ingredients and beat on high another minute until thick and creamy.
  9. Spread the batter into a greased pan and put in a preheated 350 degree oven.
  10. Brownies are done when toothpick or cake tester comes out with bits of moist brownie on it. {Check at 15 min, mine took about 25 minutes total.}
  11. Allow them to cool before cutting. Best if stored in the refrigerator.

This recipe took me about an hour to complete. And only about 5 minutes to eat two slices…

Sweet Potato Brownies

All of the ingredients

Sweet Potato Brownies

Finished Product

Here is my opinion of this recipe.

It’s the bomb.com!

Both Tom and I were a bit apprehensive about this since our last adventure of brownies were gluten free and tasted like chalk. (Luckily or unluckily, the dogs took care of them for us and ate the whole pan while we weren’t looking.)

So doing another “health craze” recipe was risky. Usually my baking is full of butter and not healthy things…

However, these did not disappoint. They are delicious. They are fairly thick, unlike normal recipes for brownies. They taste great though and don’t have a potatoey taste. (Which is good because most things potato taste like dirt to me right now…)

I will say that I like them better warm than after they have been refrigerated. Once they are cold, they resemble the thickness and taste of fudge more than a brownie. They are still good though this way, but it is definitely a different texture and I wasn’t able to eat a whole slice unlike the night before where I ate two warm slices…

We will definitely be making these again! Even better that they are healthier than most brownie recipes. Win!

Have you tried any good recipes lately? Would you have thought to put sweet potatoes in brownies?


Homemade Dried Strawberries

It is strawberry season! This is my favorite fruit, so I am always excited with spring and the beginning of summer for the best strawberries.

I apparently was over-zealous on our last grocery trip because I got more than I could eat quick enough. Normally I just freeze strawberries when they get past a couple days of fresh eating but are still good. I am a little bit of a strawberry snob, and if they get a little bit mushy into a freezer bag they go. I use them for smoothies, but I saw this recipe on Pinterest and though I would give it a whirl to add some goodness to my morning cereals.

Oven-Dried Strawberries

Ingredients

  • Strawberries
  • Lemon Juice (ratio of 1/4 tsp per pound of strawberries)

First wash your strawberries. Then cut the caps off and cut into 2 to 3 slices depending on the size of the strawberries. You don’t want the slices too small because they will shrink up enough that you may not be able to get them off the pan.

IMG_2693

Put them in a bowl and put lemon juice over them. This a guess helps with the drying process. I also probably put a little more than the recipe called for, and it didn’t affect the taste that I could tell.

I used parchment paper to alleviate having a sticky cookie sheet at the end, at the recommendation of the Pinterest find.

Lay the strawberry strips on the cookie sheet.

IMG_2705

IMG_2706

You will bake them for 4 hours at 200 degrees. I checked them at every hour.

Hour One.

IMG_2707

Hour Two.

IMG_2708

I flipped them at hour three.

IMG_2710

This was the final product. Some of them will still be a little sticky, chewy, and spongy. I found that the ones in the middle didn’t dry out as much those on the edges.

IMG_2711

They taste great! And they are perfect on top of my cheerios!

It is a lot of work, so I do not think I will do it very often. I think I may try them in our dehydrator to see if it is a little easier since I won’t have to flip at all. It is a nice change of pace though with my left over strawberries, and I don’t feel like I am wasting them.